 Instrumentiverse

Introduction to Healthy Guitar Playing in 2026
Starting guitar with proper posture and setup is essential for long-term enjoyment and injury prevention. In 2026, beginners benefit from evidence-based ergonomics that emphasize alignment, relaxation, and gradual skill building. Poor habits like hunching or excessive gripping can lead to wrist pain, shoulder tension, and back issues over time. This guide provides detailed instructions for seated and standing positions, optimal guitar height, finger positioning, and daily routines to foster sustainable playing. Whether you play acoustic, electric, or classical guitar, the principles remain consistent. Focus on neutral spine alignment and relaxed joints to support hours of practice without discomfort. Many new players overlook these fundamentals, leading to frustration and early burnout. By investing time in correct setup now, you create a foundation that supports years of progress and musical expression.
Seated Posture Fundamentals
Sitting is the most common position for beginners. Begin by choosing a sturdy, armless chair that allows your feet to rest flat on the floor. Sit toward the edge of the seat with your back straight but not rigid. Your shoulders should remain relaxed and level, while your upper arms hang naturally at your sides. Position the guitar so its body rests comfortably against your torso. For right-handed players, the waist of the guitar sits on your right leg. Keep your left foot slightly elevated on a footstool if needed to maintain a 90-degree angle at the knee. This setup promotes spinal neutrality and reduces lower back strain. Consider the angle of your torso as well; lean slightly forward from the hips rather than curving the spine. Practice in front of a mirror initially to observe and correct any slouching. Over time, these adjustments become automatic and allow for longer, more comfortable sessions.
Optimal Guitar Height and Strap Basics
Adjust the guitar height so the fretboard aligns roughly with your sternum when seated. The neck should angle slightly upward, allowing easy access to all frets without raising your shoulder. When standing, the strap should hold the guitar at the same height as your seated position for consistency. Step-by-step strap adjustment: 1. Attach the strap securely to both ends of the guitar. 2. Adjust length until the guitar sits at mid-torso level with the body resting lightly against you. 3. Test by playing open strings—your wrists should stay straight and elbows relaxed. 4. Fine-tune for comfort during extended sessions by walking around the room while strumming. Real-world example: A beginner practicing scales for 30 minutes daily noticed reduced neck tension after lowering the guitar by two inches to match their natural arm length.
Standing Posture and Movement
Standing allows more freedom but requires attention to balance. Distribute weight evenly on both feet, with knees softly bent. Avoid locking your knees or leaning backward. The guitar should hang naturally from the strap without pulling your shoulders forward. Shift weight subtly as you play to maintain circulation and prevent fatigue in the legs. Keep your head upright and gaze forward rather than tilting down excessively at the fretboard. This position is especially useful during performances or when playing with a band. Practice transitioning between seated and standing setups to build muscle memory for consistent posture in either mode.
Relaxed Shoulders, Wrists, and Finger Curvature
Shoulders down and back form the foundation of relaxed playing. Tension often creeps into the upper body during challenging passages; periodically check by shrugging and releasing. Wrists should remain in a neutral, straight position. Excessive bending increases risk of strain. For the fretting hand, curve your fingers so only the tips contact the strings, pressing just behind the fret wire. The thumb rests lightly on the back of the neck, providing support without squeezing. Example exercise: Play a simple C major chord while consciously relaxing the shoulder every four beats. Over repeated practice, this builds awareness and prevents the common habit of lifting the shoulder toward the ear.
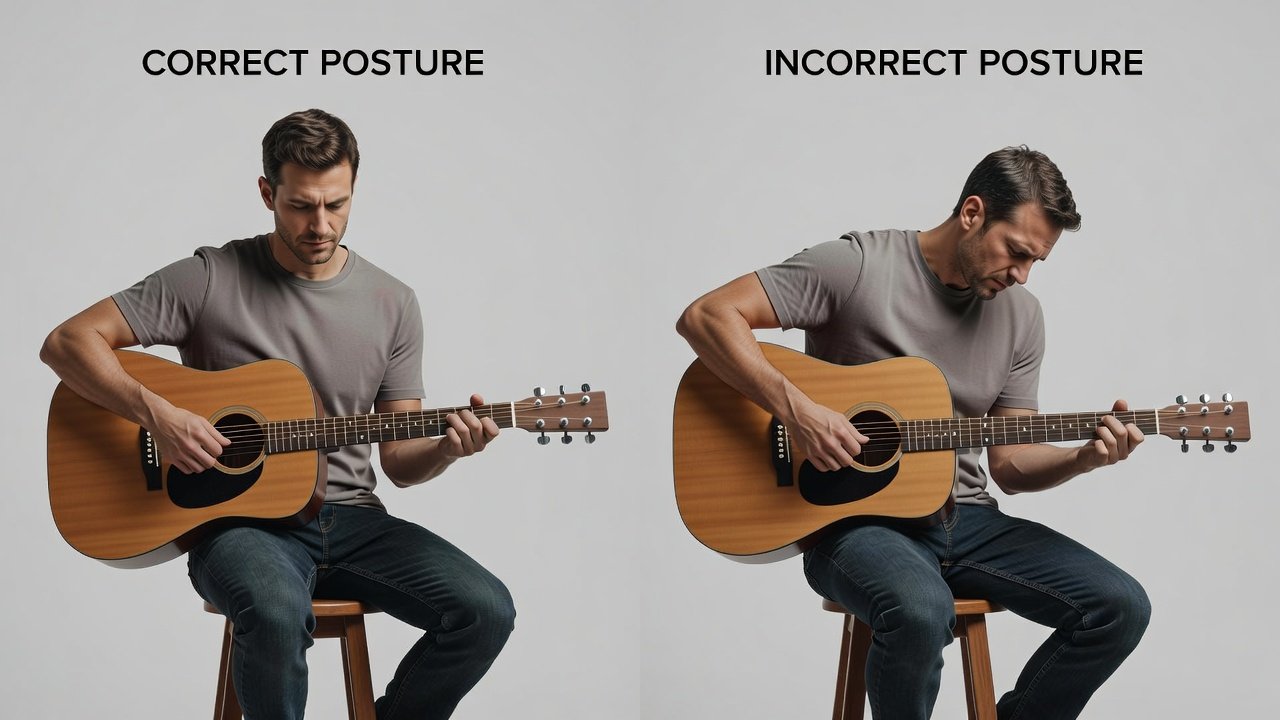
Common Beginner Errors and Corrections
- Hunching over the guitar: Sit taller and use a mirror for self-checks every 10 minutes; place a small cushion behind the lower back if needed for support.
- Gripping the neck too tightly: Practice light pressure drills—aim for just enough force to produce clear notes; imagine holding a fragile egg between thumb and fingers.
- Letting the guitar slide downward: Tighten the strap slightly and engage core muscles gently while standing; check strap length before every session.
- Flat fingers on the fretboard: Visualize holding a small ball to encourage natural curvature; slow down chord changes to focus on fingertip placement.
- Twisting the torso: Keep hips square to the guitar body and adjust chair height so both feet support equal weight.
Quick Self-Check Routines and Daily Drills
Perform these checks before each practice session: Scan from head to toe for tension. Play a simple scale while monitoring wrist angle. Record yourself weekly to observe posture improvements. Daily drills include: 5 minutes of open-string strumming with focus on relaxed shoulders; finger independence exercises using minimal pressure; and 2-minute posture resets every 20 minutes of play. Additional routine: Spend 3 minutes alternating between seated and standing positions while maintaining the same guitar height and wrist alignment. Track progress in a practice journal noting any areas of discomfort and how corrections felt.
Adjusting Setup as Skills Progress
As you advance, revisit your setup every few months. Increased speed and complexity may require minor height tweaks or the addition of supportive accessories like padded straps or ergonomic stools. For instance, when learning barre chords, a slightly higher neck angle can reduce wrist extension. Consult a teacher or physical therapist specializing in musicians if discomfort persists. Progression example: After three months of consistent practice, many players lower the strap one notch to accommodate faster picking techniques while preserving shoulder relaxation.
Recommended Supportive Accessories
Consider a footstool for seated elevation, an adjustable padded strap for even weight distribution, and a full-length mirror for visual feedback. These items promote better habits without adding complexity. A stable guitar stand also helps maintain consistent height between practice sessions. Focus on quality construction that supports natural body alignment rather than temporary fixes.
FAQ
When should I adjust my guitar setup? Reassess whenever you notice new tension or after major changes in playing style, typically every 3-6 months.
What supportive accessories help beginners? Consider a footstool, adjustable strap, and mirror for visual feedback. These promote better habits without complexity.
How long until good posture feels natural? Consistent attention for 4-6 weeks usually builds muscle memory for relaxed positioning.
Can posture affect tone or speed? Yes, tension restricts finger movement and can dull string vibration; relaxed form improves both clarity and velocity over time.
Is it okay to rest the guitar on one leg only? For classical style yes, but most beginners benefit from balanced support on both legs or a strap to avoid uneven hip loading.
Resources from National Institutes of Health, Centers for Disease Control and Prevention, and Mayo Clinic highlight the importance of ergonomic practices for repetitive activities like playing instruments. By following these guidelines, you set yourself up for a lifetime of enjoyable guitar playing.

No comments yet. Be the first!