 Instrumentiverse

Introduction to Ergonomic Drumming Foundations
Starting drums in 2026 with a focus on ergonomics helps beginners build sustainable habits that protect joints and muscles long-term. Drawing from proven piano posture principles, this guide emphasizes safe positioning to reduce strain and support consistent practice. Proper setup prevents common issues like wrist pain or back discomfort that often sideline new players within the first six months. Ergonomics in drumming means aligning your body with the instrument for natural movement. This approach supports better sound production and faster skill development from day one while minimizing the risk of repetitive strain injuries that plague many self-taught drummers.
Many beginners rush into playing without considering how their body interacts with the kit. Over time this leads to tension, fatigue, and even chronic problems. By investing time in correct setup now, you create a foundation that allows years of enjoyable playing. The principles covered here apply whether you practice on an acoustic kit, electronic drums, or a practice pad setup at home.
Setting Proper Throne Height and Kit Positioning
Throne height forms the base of any ergonomic drum setup. Sit with feet flat on the floor and thighs parallel to the ground or slightly angled downward. Adjust the throne so knees form a 90- to 110-degree angle when your feet rest on the pedals. This position allows relaxed leg movement without locking joints or forcing your hips into an unnatural tilt. For example, if your knees rise above hip level, lower the throne immediately to avoid lower back compensation. Taller players often need throne extensions, while shorter players may benefit from foot platforms under the pedals.
Place the snare drum at a height where your forearms remain roughly parallel to the floor when striking the center. Toms should follow a gentle downward slope from the snare so each strike feels like a natural extension of arm movement. Bass drum pedal positioning requires your heel to stay grounded while the ball of the foot operates the beater. Test this by playing steady quarter notes at a slow tempo and notice whether your leg stays relaxed or begins to tense after thirty seconds.
Maintaining Back Alignment During Play
Back alignment prevents fatigue during extended sessions. Sit tall with shoulders relaxed and spine in a neutral curve. Avoid slouching forward or arching excessively. Engage core muscles lightly to support the lower back without tension. A mirror or phone camera helps check alignment during initial setups and weekly reviews. Keep elbows close to the body at a natural 45-degree angle. This reduces shoulder strain and promotes efficient stick motion across the kit. Over time, poor back posture can lead to rounded shoulders that limit reach and increase wrist loading.
Foot Pedal Positioning for Stability
Position the bass drum pedal so your leg extends comfortably without overreaching. The hi-hat pedal should sit at a similar distance, allowing easy transitions between feet. Ensure pedals remain stable on the floor to avoid shifting that disrupts rhythm. Many players place a drum rug underneath the entire kit to anchor everything in place. This small addition makes a noticeable difference during fast patterns or when moving between the bass drum and hi-hat.
Matched Grip Versus Traditional Grip Options
Matched grip offers symmetry and works well for most beginners across rock, pop, and metal styles. Both hands hold sticks identically with palms facing down. Traditional grip, with one hand rotated palm-up, suits jazz and marching contexts but requires more initial adjustment for wrist mobility. Experiment with both during early lessons. Matched grip often provides quicker comfort for new players focused on ergonomic health. 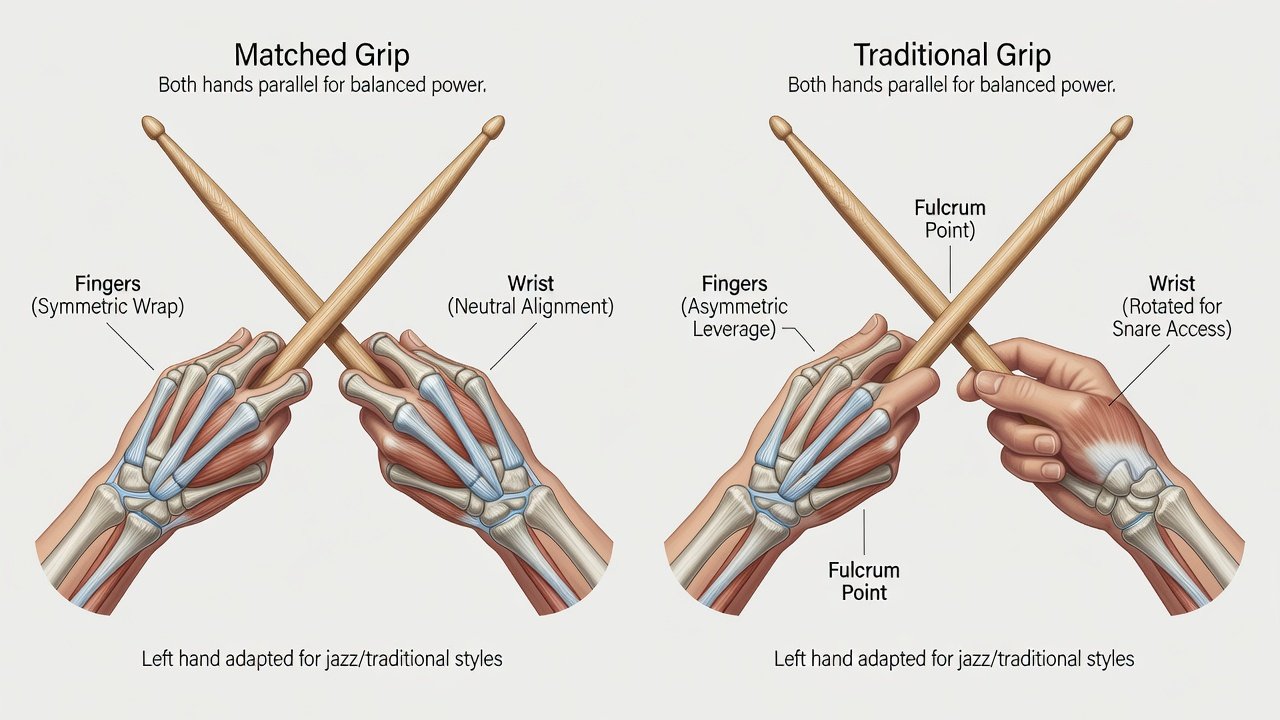
Start with matched grip to develop balanced control, then explore traditional grip once basic coordination improves. Each grip affects wrist angle differently, so monitor how your forearms feel after ten minutes of practice.
Step-by-Step Ergonomic Setup Process
- Adjust throne height first using the thigh-parallel guideline and sit for two minutes to confirm comfort.
- Position the snare and test arm angles with light taps at different dynamic levels.
- Set bass drum and hi-hat pedals for natural foot reach while keeping heels down.
- Arrange toms in a slight arc that follows your natural arm swing without twisting the torso.
- Verify overall posture with a quick mirror check and make micro-adjustments.
- Play a simple groove for one minute and note any emerging tension points.
Common Posture Mistakes That Cause Wrist Strain
- Slouching forward that forces wrists into awkward angles and increases impact force.
- Raising the throne too high, leading to dangling feet and tense shoulders that travel down the arms.
- Over-gripping sticks instead of using relaxed finger control and rebound.
- Placing pedals too far away, causing hip and lower back compensation that eventually affects upper body alignment.
- Ignoring elbow position so arms flare outward and create unnecessary wrist extension.
Quick Daily Checks for Ergonomic Alignment
Before each practice, run through a 30-second checklist: throne height, foot contact with pedals, neutral spine, relaxed shoulders, and loose grip. These micro-adjustments reinforce healthy habits quickly and become automatic after two weeks of consistent use. Consider keeping a small notebook near your kit to log any discomfort and how adjustments resolved it.
Affordable Tools to Enhance Ergonomic Setup
Drum rugs provide stability for pedals and reduce floor vibrations that can travel through the body. Throne cushions add comfort for longer sessions without altering height. Both options improve setup consistency affordably and support better posture over time. Look for rugs with non-slip backing and cushions that maintain firmness rather than compressing too much.
Practice Routines That Reinforce Healthy Positioning
Begin sessions with five minutes of slow single strokes while monitoring posture. Progress to simple rudiments on the snare before moving around the kit. Alternate between matched and traditional grips during warm-ups to build versatility. Record short videos weekly to review alignment and catch emerging issues early. A sample 20-minute routine includes five minutes of posture-focused singles, five minutes of alternating hi-hat and snare patterns, five minutes of light bass drum integration, and five minutes of free play while maintaining the checklist mentally.
Preventing Common Injuries Through Ergonomics
Wrist tendonitis and lower back strain rank among the most frequent issues for beginners. Prevention starts with the setup steps above and continues with gradual volume increases. Never practice through sharp pain. Instead, stop, reassess position, and resume only when discomfort subsides. Resources from Mayo Clinic and the Percussive Arts Society offer additional guidance on musician health.
FAQ: Adjusting Ergonomics for Different Body Types
How should taller players adjust throne height?
Taller drummers may need extra throne extensions or custom risers to maintain the thigh-parallel position while keeping feet on pedals without excessive knee bend.
What works best for shorter players?
Shorter individuals benefit from lower throne settings and possibly smaller drum sizes or angled pedal plates to achieve proper reach without strain or floating feet.
Can left-handed setups follow the same ergonomic rules?
Yes, mirror the standard layout while preserving the same angle and height principles for balanced posture and equal reach on both sides.
How do different body weights affect throne stability?
Heavier players should choose thrones with wider bases and reinforced hydraulics to prevent wobbling that disrupts alignment during dynamic playing.
Are there specific considerations for players with previous injuries?
Consult a physical therapist familiar with musicians before starting. They can recommend specific angle modifications or supportive accessories tailored to your history.
Conclusion
Building ergonomic foundations in 2026 sets beginners on a path of injury-free progress. Consistent attention to throne height, alignment, pedal placement, and grip choice creates lasting comfort and stronger technique. Apply these principles daily to enjoy drumming for years ahead. For more on musculoskeletal health, consult Mayo Clinic resources and World Health Organization guidelines.


No comments yet. Be the first!