 Instrumentiverse

Introduction to Mastering EQ for Punchy Beats
Intermediate beat makers understand that a powerful mix starts with precise equalization. In 2026, stock DAW EQ plugins offer sophisticated tools that rival many premium options, allowing you to sculpt drums and bass into punchy, professional-sounding elements. This comprehensive guide explores advanced techniques for carving frequencies, leveraging dynamic processing, performing surgical adjustments with visual spectrum analysis, and avoiding common pitfalls like phase cancellation. Whether you produce hip-hop or trap, these hands-on strategies will help you achieve mixes with clarity, impact, and energy that translate well across streaming platforms and club systems.
Understanding the Frequency Spectrum in Beat Making
Before diving into adjustments, it is essential to map out the frequency ranges that define punchy beats. Low-end frequencies from 20 Hz to 250 Hz provide the foundation for kicks and bass, delivering the physical thump listeners feel. Midrange areas between 250 Hz and 2 kHz often introduce muddiness if left unchecked, while upper mids from 2 kHz to 8 kHz add attack and presence to snares and hi-hats. High frequencies above 8 kHz contribute air and sparkle but can become harsh if overboosted. Using your DAW's built-in spectrum analyzer, load a reference track and compare peak levels across these bands to identify where your beat lacks definition or suffers from buildup.
EQ Fundamentals Tailored to Drums and Bass
Drum elements require targeted EQ to maintain punch without overwhelming the mix. For kick drums, focus on the sub-bass region around 40-60 Hz for weight, the punch area near 100-150 Hz, and transient clarity between 3-5 kHz. Snares benefit from body boosts at 200-400 Hz and crisp attacks at 5-7 kHz. Hi-hats and cymbals live higher, typically needing subtle high-shelf boosts above 10 kHz for brightness. Bass lines, whether synth or sampled, occupy overlapping low frequencies, so sidechain compression or EQ carving becomes critical to prevent masking. Always solo each element first, then listen in context to ensure the low end remains tight and controlled rather than boomy.
Frequency-Specific Carving Strategies for Clarity
Effective carving involves precise cuts and boosts at problematic frequencies. Begin by applying a high-pass filter at 30-35 Hz on non-bass elements to eliminate unnecessary sub-rumble. On kicks, make a narrow cut of 2-4 dB at 250-350 Hz to remove boxiness while preserving thump. For bass, attenuate around 150-200 Hz by 3 dB to create space for the kick's fundamental. Boosts should be wider and gentler: a 2-3 dB shelf at 60 Hz on the kick adds warmth, and a similar lift at 80 Hz on bass enhances groove. These strategies, when applied consistently, result in beats that feel more open and powerful, especially in dense trap arrangements with layered 808s.
Dynamic EQ Versus Static EQ: When and How to Use Each
Static EQ applies fixed adjustments across the entire track, making it ideal for consistent tonal shaping like taming harsh hi-hat resonances. Dynamic EQ, however, responds to signal level and excels in beats where elements interact dynamically. For example, set a dynamic band on your bass track to dip 4 dB at 80 Hz only when the kick exceeds a certain threshold, creating automatic space without manual automation. Stock DAW plugins often include dynamic modes with adjustable attack and release times—use slower attacks for natural pumping effects in hip-hop and faster settings for precise trap kicks. Compare the two approaches on the same loop: static EQ provides stability while dynamic processing adds movement and prevents frequency masking during busy sections.
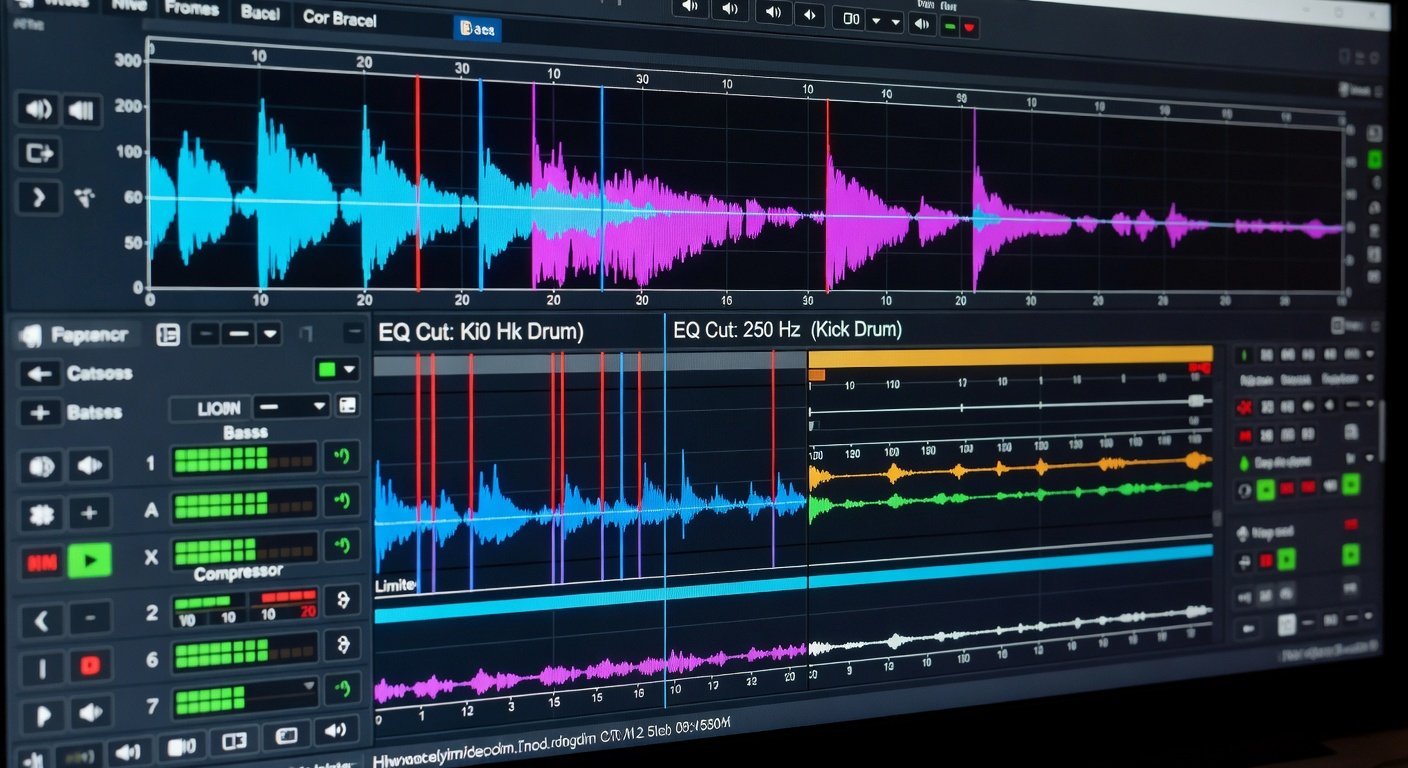
Surgical Cuts, Boosts, and Visual Spectrum Analysis Examples
Visual analysis transforms guesswork into precision. Load your drum bus into the stock EQ and enable the real-time spectrum display. Look for spikes exceeding the average level by more than 6 dB—these indicate resonances needing narrow Q cuts of 1-3 dB. In one hip-hop example, a kick showed excessive energy at 280 Hz; a 2.5 dB cut there cleaned the mud while a broad 1.5 dB boost at 90 Hz restored punch. For bass in trap beats, spectrum views often reveal buildup around 120 Hz that a dynamic cut resolves effectively. Always A/B test by bypassing the plugin and note the improved separation between kick and bass after adjustments.
Step-by-Step Tutorials Using Stock DAW Plugins
Follow these detailed workflows in your preferred DAW. First, for a basic kick enhancement: insert the stock EQ on the kick channel, enable spectrum analysis, apply a high-pass filter at 35 Hz with a 12 dB/octave slope, then add a narrow parametric cut at 300 Hz and a bell boost at 80 Hz. Second, for bass carving: route the bass to a bus, insert dynamic EQ, target 150 Hz with a medium Q, set threshold to match your kick's peak, and adjust ratio for subtle ducking. Third, for full drum bus processing: group kicks, snares, and hats, apply a static high-shelf boost above 8 kHz for air, followed by a dynamic cut in the low-mids to control buildup. Export short clips before and after each step to evaluate progress objectively.
Before-and-After Audio Comparisons for Hip-Hop and Trap Beats
Consider a typical trap beat with an 808 bass and punchy kick. Before EQ, the low end collides, resulting in a muddy, undefined rumble during playback. After applying the carving strategies and dynamic EQ described, the kick cuts through with clear attack, the bass gains definition, and the overall groove feels tighter. In hip-hop examples, before-and-after tests reveal increased perceived loudness and better translation on small speakers. Record these comparisons in your DAW session and reference them during mixing to reinforce good habits and quickly identify when frequencies need rebalancing.
Tips for Avoiding Phase Issues in Layered Drums
Phase problems arise when layering multiple kick samples or using multi-mic drum recordings, causing cancellation that weakens punch. To mitigate this, check polarity inversion on each layer and flip the phase on the one that sounds weaker in combination. Prefer linear-phase EQ modes for surgical work on drum groups to minimize time smearing. Monitor in mono frequently, as phase issues become more apparent when stereo information collapses. These practices ensure your low-end remains focused and powerful rather than hollow or thin.
Common Mistakes to Avoid When EQing Beats
- Over-boosting lows, which leads to boominess and poor translation on consumer systems.
- Using overly narrow Q settings that create unnatural notches and affect musicality.
- Ignoring context by soloing too long instead of checking the full mix balance.
- Skipping high-pass filtering on non-essential tracks, allowing unnecessary low-end buildup.
- Neglecting automation for dynamic sections where static EQ falls short.
Genre-Specific EQ Presets and Applications
For trap beats, start with a preset emphasizing sub-bass emphasis at 50 Hz on the kick and a dynamic dip at 200 Hz on the 808. Hip-hop productions often require more midrange body, so boost snare fundamentals at 250 Hz while carving bass at 180 Hz for separation. Experiment by saving custom presets in your DAW for quick recall across sessions, adjusting thresholds based on tempo and density.
Troubleshooting FAQ on Muddy Mixes and Presets
- Q: My mix sounds muddy in the low-mids. What should I do? A: Apply narrow cuts between 200-500 Hz on drums and bass, then recheck with spectrum analysis.
- Q: How do I create a genre-specific preset for trap? A: High-pass at 30 Hz, dynamic cut at 250 Hz on bass, and high-shelf boost at 10 kHz on hats.
- Q: Why does my beat lose punch after EQ? A: Reduce boost amounts and ensure dynamic EQ is not over-compressing transients.
- Q: Can stock plugins handle professional results? A: Yes, with careful analysis and iterative A/B testing they deliver competitive mixes.
Conclusion: Elevate Your Mixing Skills with Targeted EQ
By mastering these EQ techniques in your DAW, you will produce beats with superior punch, clarity, and professionalism. Apply the step-by-step methods, compare before-and-after results, and refine your approach through practice. For additional insights into music production, visit Sound on Sound and Pro Sound Web. Consistent application of these principles will noticeably improve your mixing skills and help your tracks stand out in 2026.

No comments yet. Be the first!