 Instrumentiverse

Introduction to Advanced MIDI in Modern DAWs
Intermediate producers in 2026 are moving beyond basic MIDI note entry to unlock expressive, dynamic tracks. Advanced MIDI techniques allow precise control over timing, dynamics, and expression, transforming static loops into evolving musical ideas that stand out in competitive releases. This comprehensive guide covers MIDI mapping, arpeggiation, velocity editing, modulation routing, and seamless virtual instrument integration across popular DAWs like Ableton Live, FL Studio, Logic Pro, and Cubase. By mastering these methods, you can create beats and arrangements that feel alive and professional without relying solely on audio manipulation.
Effective MIDI programming starts with understanding your DAW’s piano roll, controller capabilities, and MIDI effects ecosystem. Whether building intricate beats, atmospheric pads, or hybrid electronic-acoustic hybrids, these techniques deliver results that elevate your workflow. Producers who invest time in these skills often report faster iteration cycles and more creative satisfaction, especially when collaborating or preparing tracks for live performance.
MIDI Mapping for Custom Workflows
MIDI mapping connects hardware controllers to DAW parameters for real-time manipulation, turning your studio into an interactive instrument. Begin by opening your controller’s MIDI learn mode, then assign knobs to filter cutoff, macro controls, or even plugin parameters. In Ableton Live, right-click any parameter and select “MIDI Map” for instant assignments that respond instantly to physical movement. FL Studio users can access the MIDI settings panel to link pads directly to the channel rack, enabling complex drum triggering or sample layering.
Advanced mapping includes conditional rules such as velocity-sensitive assignments that trigger different samples based on playing force. This creates responsive drum kits or multi-layered synth patches that adapt to performance nuance. Test mappings thoroughly in a new project to avoid conflicts with existing automation lanes, and consider saving mapping templates for quick recall across sessions. For deeper integration, explore MIDI CC chaining where one controller movement affects multiple parameters simultaneously, adding movement and interest to otherwise static sounds.
Step-by-Step MIDI Mapping Example
- Connect your MIDI controller and open the DAW’s MIDI preferences.
- Enter MIDI learn mode on your hardware or within the software.
- Select the target parameter, such as a synth’s resonance knob.
- Move the physical control to create the link and save the mapping preset.
- Test across different velocities and refine ranges to prevent unwanted jumps.
Creative Arpeggiation Techniques
Arpeggiators generate rhythmic patterns from held chords, serving as a foundation for melodic development in electronic and hybrid productions. Modern DAWs feature built-in arpeggiators with adjustable rate, gate length, swing, and note order controls. In Logic Pro, the Arpeggiator MIDI effect allows precise setting of note order, octave range, and velocity curves for evolving sequences that can span several bars without repetition.
For deeper creativity, chain multiple arpeggiators or route them through additional MIDI effects like randomizers and note repeaters. Combine with step sequencers to produce polyrhythms that add complexity to beats. Always record the output as editable MIDI data so you can humanize or rearrange individual notes afterward. This preserves algorithmic precision while retaining a human feel that resonates with listeners. Experiment with different scales and chord inversions to generate unexpected melodic lines that fit your track’s emotional arc.
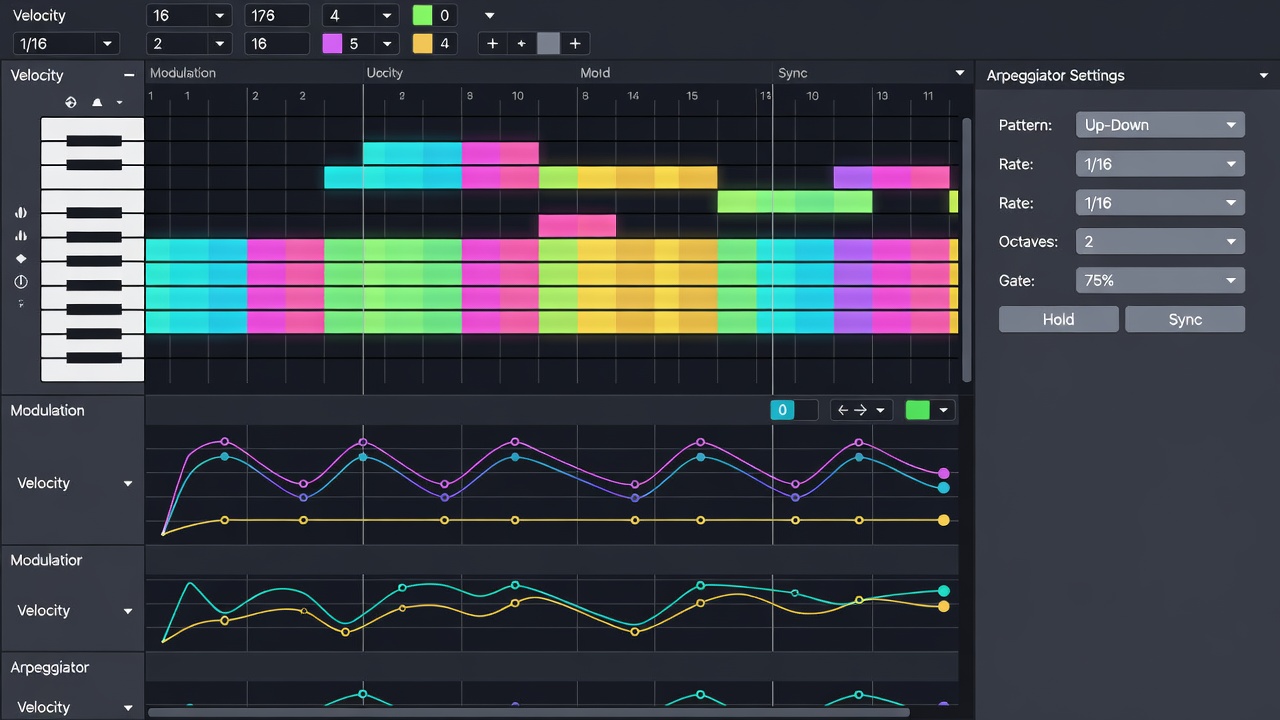
Velocity Editing for Expressive Dynamics
Velocity data controls note loudness and timbre, making it one of the most powerful tools for musical expression. Advanced editing involves drawing custom velocity curves in the piano roll to mimic acoustic instrument nuances such as the natural decay of a piano or the attack variations in percussion. Use your DAW’s pencil or brush tool to create gradual crescendos, randomized velocities within a narrow range, or dramatic accents that drive the groove forward.
A practical technique involves duplicating a MIDI clip, shifting velocities by 10-15 points on the duplicate, and layering it slightly offset in time. This adds depth to hi-hat patterns, melodic lines, and basslines without loading extra virtual instruments. In FL Studio, the piano roll’s velocity tool allows per-note editing with visual feedback, while Ableton’s clip view supports velocity lane drawing for quick adjustments. Combine velocity editing with subtle timing offsets to avoid the mechanical sound that plagues many beginner productions.
Modulation Routing and Automation
Modulation routing links MIDI CC messages to parameters like vibrato depth, filter resonance, or even macro controls that affect entire instrument patches. Route aftertouch to pitch bend for expressive leads or assign modulation wheel data to control multiple parameters simultaneously via macros. This approach creates evolving textures that change over time without constant manual intervention.
Automation lanes complement routing by allowing precise envelope shapes that can be drawn or recorded in real time. Draw slow-moving LFO-style automation on pitch or pan for evolving textures that keep listeners engaged. Export these automation curves as standard MIDI files to reuse across projects and different DAWs. In Cubase, the MIDI track’s controller lanes provide fine-grained control, making complex modulation setups easier to manage than in many competing platforms.
Integrating MIDI with Virtual Instruments
Load virtual instruments that respond richly to MIDI expression data for maximum impact. Instruments supporting MPE (MIDI Polyphonic Expression) offer per-note pitch bends, pressure, and timbre control that dramatically increase realism. Route multiple MIDI tracks to a single multi-timbral instrument for complex arrangements that conserve CPU resources while maintaining flexibility.
Record MIDI from hardware keyboards directly into the DAW while monitoring through high-quality virtual instruments. Apply light quantization only after capturing the performance to retain timing variations that define groove. Many producers also use MIDI routing to trigger external hardware synths alongside software instruments, blending the best of both worlds for unique hybrid sounds.
Practical Recording Tips and Mixing Integration
Record MIDI in short passes, focusing on one element at a time to maintain concentration and performance quality. Use cycle recording with overdub enabled to layer rhythmic or melodic variations without starting over. After recording, clean up data by removing duplicate notes, smoothing extreme velocity spikes, and adding subtle humanization where needed.
In the mix stage, route MIDI-driven instruments to separate audio tracks for individual processing. Apply sidechain compression triggered by kick drums or use MIDI-triggered effects sends to glue elements together. This hybrid MIDI-to-audio workflow keeps productions flexible for last-minute changes while delivering polished results that translate well across playback systems. Consider exporting stems with both MIDI and audio versions for maximum future-proofing.
Common MIDI Pitfalls in 2026 Setups – FAQ
- Why does my MIDI sound robotic? Increase timing humanization and vary velocities; avoid full quantization on every note and experiment with swing settings.
- How do I fix latency during recording? Lower buffer size in audio preferences, enable low-latency monitoring mode, and ensure your audio interface drivers are up to date.
- Can I transfer MIDI projects between DAWs? Export standard MIDI files (.mid) and import them; check for compatibility issues with controller assignments and plugin-specific data.
- What about MPE support? Ensure both your controller and virtual instruments support MPE for advanced per-note expression in current 2026 workflows.
- How should I organize large MIDI sessions? Color-code tracks, use folders or track groups, and name clips descriptively to maintain clarity as projects grow.
Conclusion
Mastering these advanced MIDI techniques elevates music production from functional to truly creative and expressive. Experiment across your preferred DAW and combine methods to develop a signature sound that resonates with audiences. For further official resources, explore MIDI Manufacturers Association and Sound on Sound. Continued practice with these tools will consistently improve both your speed and the emotional impact of your tracks.
No comments yet. Be the first!