 Instrumentiverse

Introduction to Safe Piano Playing Techniques
Learning piano begins with building habits that protect your body for years of enjoyable playing. In this piano tutorial, we focus on proper posture and hand position basics, essential elements that help prevent strain while optimizing technique across musical instruments. Correct alignment supports fluid movement and reduces the risk of repetitive stress issues that can sideline beginners and advanced players alike. Whether you are starting your first lesson or refining fundamentals in 2026, understanding these principles creates a strong foundation for lifelong musical enjoyment. Poor habits lead to tension that limits speed, accuracy, and endurance over time, often turning what should be a rewarding hobby into a source of discomfort.
Many new pianists overlook these fundamentals in their eagerness to play songs, but investing time upfront pays dividends. This guide draws on established ergonomic principles to deliver actionable advice tailored for safe, sustainable progress.
Why Proper Posture and Hand Positioning Matter
Correct posture distributes weight evenly and keeps muscles relaxed, allowing fingers to move independently without forcing the wrists or shoulders. This approach supports long practice sessions and protects joints during extended play. Health research consistently shows that ergonomic positioning in instrumental practice lowers injury rates significantly by maintaining neutral body alignment. Hand positioning directly influences tone production and technical control because curved fingers produce clearer notes and enable faster passages without unnecessary force. Over time, these basics become automatic, freeing mental energy for musical expression rather than fighting physical discomfort. Neglecting posture can lead to chronic issues like tendonitis or back pain, which is why experts emphasize early correction for all ages and skill levels.
Step-by-Step Bench Setup
Start by adjusting your piano bench height so your forearms remain parallel to the floor when hands rest on the keys. Sit toward the front edge with feet flat on the ground and knees at a slight angle below hip level. Your back stays straight but not rigid, with shoulders relaxed and level to avoid unnecessary strain on the upper body. Position the bench at a distance where elbows hang naturally at your sides without reaching forward. The keyboard should align with your midsection for optimal reach. Test this setup by playing a few scales—if shoulders rise or wrists bend sharply, make small adjustments incrementally. Players of shorter stature often benefit from an adjustable footrest to maintain neutral spinal alignment. Take time to fine-tune the bench each session, as even slight variations can affect comfort during longer practice periods. Consider marking ideal settings on adjustable benches for consistency across different instruments or venues.
Ideal Finger Curvature and Examples
Imagine holding a small ball in each hand to achieve the natural curve recommended by piano pedagogues. Fingers contact keys at the fingertip pads rather than flat joints, promoting efficient energy transfer and reducing joint stress. The thumb stays relaxed and slightly curved, striking from its side rather than the pad for better control. For example, when playing middle C with the right hand, the index finger curves gently while the wrist remains level and the arm hangs loosely. Practice slowly by depressing each key using only finger motion without lifting or collapsing the hand structure. Repeat on all five fingers across both hands to build muscle memory. Another practical example involves playing a C major scale: maintain the curved shape throughout, ensuring each note rings clearly without pressing harder than necessary. This technique also improves dynamic control, allowing softer or louder playing with minimal effort.
Common Mistakes and How to Correct Them
Many beginners flatten their fingers completely, causing tension to build in the palm and forearm. Correction involves consciously lifting the knuckles slightly while keeping contact light and relaxed. Another frequent error is raising shoulders toward the ears during challenging passages, which restricts blood flow and creates upper body tightness; pause and consciously drop the shoulders with a deep breath. Slouching forward rounds the upper back and restricts breathing, limiting oxygen flow to muscles. Sit tall and engage core muscles lightly for support without locking into rigidity. Wrist collapse below keyboard level strains tendons over time—use a mirror, smartphone recording, or teacher feedback to monitor and adjust in real time. Additional mistakes include locking elbows or gripping the bench edge too tightly; both disrupt the relaxed chain of movement from shoulder to fingertip. Addressing these early prevents the development of compensatory habits that are harder to unlearn later.
Short Video-Style Daily Routine
Begin each session with five minutes of posture checks: sit, align your body, and breathe deeply several times. Then perform finger curls by lifting and lowering each digit independently ten times per hand while keeping the wrist stable. Follow with slow five-note scales focusing exclusively on maintaining curved positions and relaxed shoulders. Expand the routine by adding wrist rotations and gentle stretches for the forearms after the scales. End by playing a simple melody while scanning for tension every thirty seconds and making micro-adjustments. This complete sequence reinforces good habits quickly and can be finished in under fifteen minutes before transitioning to full repertoire practice. Repeat the routine at the start of morning and evening sessions for faster results.
2026 Ergonomic Tool Updates for Pianists
Modern adjustable benches now feature memory foam padding and built-in lumbar support to enhance comfort during extended sessions. New keyboard risers and contoured wrist rests designed specifically for digital pianos help maintain neutral wrist angles even on compact home setups. Players exploring these options often pair them with posture-feedback apps that use device cameras for real-time guidance. When selecting tools, prioritize models with smooth height adjustments and stable bases rather than decorative features. These advancements make it easier than ever for beginners to maintain ideal positioning without constant manual corrections.
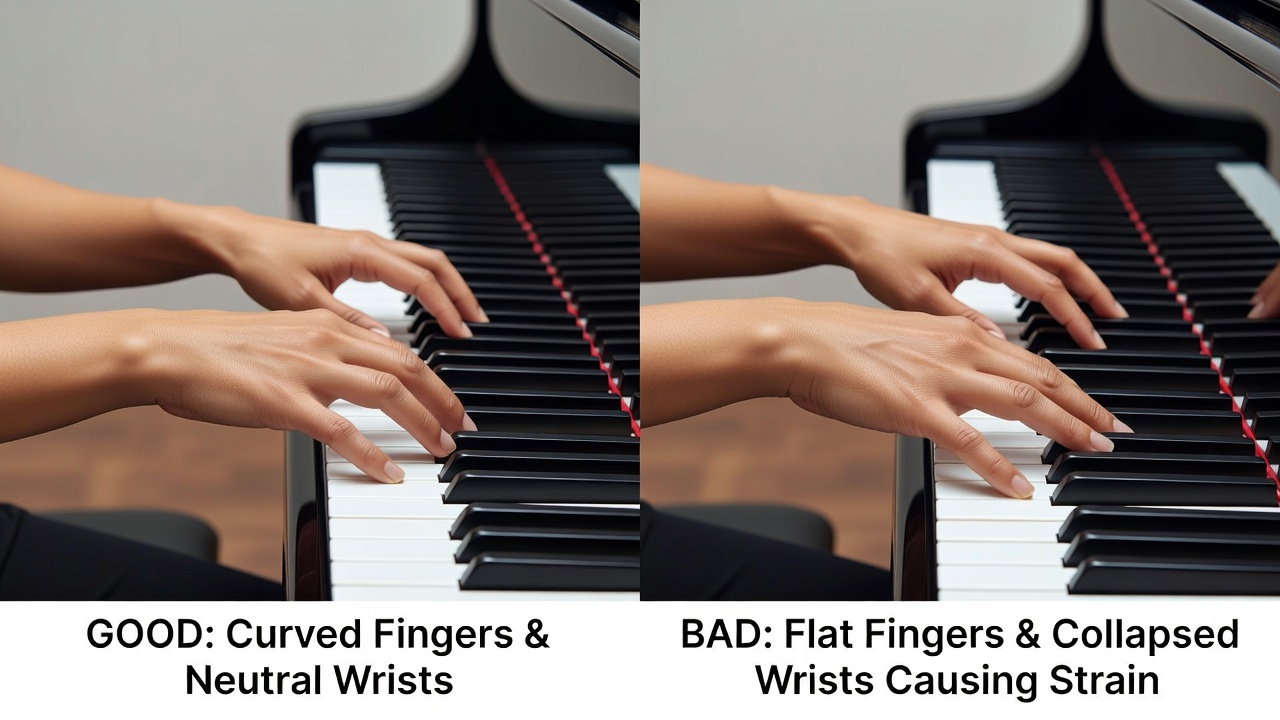
Comparing Good Versus Bad Posture
Good posture photos show relaxed shoulders, level wrists, and gently curved fingers creating an open hand shape that allows free movement. The spine appears elongated, and the entire body looks balanced and ready for fluid motion. Bad examples reveal hunched backs, elevated elbows, and collapsed wrists that compress nerves and limit reach. Side-by-side visual comparisons help learners self-assess quickly during practice. Try photographing your own setup from multiple angles and comparing them to professional examples to identify personal tendencies toward poor alignment. Regular visual checks accelerate improvement and build self-awareness that carries over into performances.
Frequently Asked Questions on Related Aches
- Why do my wrists hurt after twenty minutes of playing? This is often caused by collapsed wrist positioning or incorrect bench height. Revisit the setup steps and incorporate short breaks every fifteen minutes with gentle stretches.
- Can poor finger curvature cause ongoing finger pain? Yes, flattened fingers overload the joints and surrounding tissues. Practice the ball-holding visualization daily to restore natural curves and reduce pressure.
- Are ergonomic tools necessary for absolute beginners? They provide helpful support but are not mandatory at the start. Focus first on developing body awareness through the routines described before investing in accessories.
- How long does it take for good posture to feel natural? With consistent daily checks and mindful practice, most players develop automatic habits within four to six weeks, though individual progress varies.
- What should I do if back pain persists despite corrections? Consult a qualified instructor or healthcare professional experienced with musicians to rule out other factors and receive personalized guidance.
Conclusion
Mastering posture and hand position transforms piano practice from a potential source of strain into a sustainable, joyful activity. Apply these fundamentals consistently during every session, reference authoritative health guidance such as resources from Mayo Clinic, OSHA, and World Health Organization for broader ergonomics insights, and enjoy steady progress on your musical journey. The time spent refining these basics will reward you with greater comfort, improved technique, and longer playing longevity.

No comments yet. Be the first!